Mp3tag
From SqueezeboxWiki
/These instructions are correct for Mp3tag version 2.36./
/Thanks to forum user Geoff B for some of these tips, see here./
Here are several tips for using Mp3tag that will help you manage your MP3 and FLAC file tags with SlimServer:
Backup, Backup, Backup!
Before you do any of the large-scale changes described below, BACKUP FIRST! What if the program were to crash halfway through making these changes? It has happened.
Sorting
Click on a column to sort items in that column in ascending order and click it again to sort in descending order. You will see a small "up" chevron to indicate an ascending sort, and a small "down" chevron to indicate a descending sort. This can be very powerful when used with many files as files which are untagged, files which have tag types different than others, etc. will be sorted and grouped together at the top or bottom of the list.
Selecting Multiple Items
After sorting and grouping the files you want to change, you can select a list one-at-a-time by holding CTRL as you click on the files. To select a continuous list, select the first file, then hold SHIFT and select the last one.
Filtering
If you want to perform an operation on a set of files that isn't neatly selected by choosing a directory, or sorting, there is a very powerful Filter feature available which makes it practicable to work with the entire library. Look for the Filter pane at the bottom of the screen - if its not there press F3 to turn it on. You can then specify a Field and a string and it will filter just the tracks that match - e.g. find all tracks with "Concerto" in the Title.
Displaying the Tag Type Currently Used
Newer versions have a Tag column by default, but if you're using an older version:
Right-click on a column heading on the right and choose "Customize columns...".
Click on the "New configuration" icon, which looks like this:
In the "Name" field, type in "Current Tag" or whatever you like.
In the "Value" field, type in "%_tag_read%" as shown in the image above.
Press OK.
Mp3tag will now have a new column displaying the active tag type, i.e. the tag type used to display the information in the left pane.
Displaying All Tags Present In the File
Follow a similar procedure to the above, but name the column "Tags In File" or something similar and type "%_tag%" in the value field.
Mp3tag will now have a new column displaying all tag types present in the file. Note SlimServer prefers ID3v2 tags, and keep in mind that ID3v1 tags have a 30-character limit. A file can have both types, which may confuse SlimServer.
If you have analyzed your files with MP3Gain they will also have APEv2 tags in them.
Newer versions combine All Tags and Tag Type into one column. This is accomplished by using a value of %_tag_read%[(%_tag%)] for the single column.
Configuring Mp3tag
There is no need to configure Mp3Tag for FLAC, but if you are using Mp3:
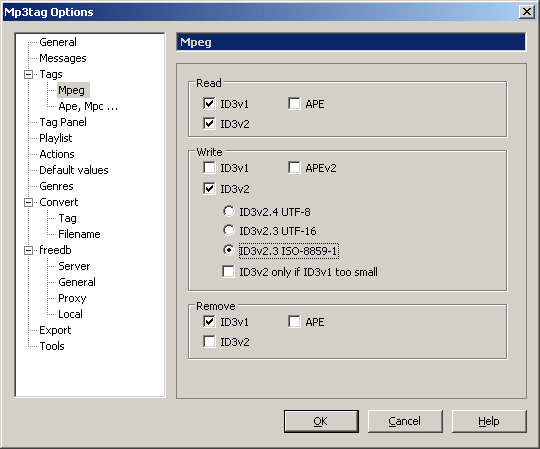
Go to Tools - Options - Tags - Mpeg and set the options like this:
This will ensure ID3v1 and ID3v2 tags are read, only ID3v2 tags get written and ID3v1 tags get removed.
The ID3v2.3 ISO 8859-1 radio button works well for characters from several languages but you may want to use one of the UTF options if your language uses these character sets.
Writing Tags
You can enter tags from scratch or correct existing ones, and as soon as you press the Save icon, this data will be written to ID3v2 tags. If you are using FLAC then Mp3Tag will write data to Vorbis comments rather than ID3 tags, which will be listed as FLAC tags in the Tag column.
If the main screen's left hand pane is filled out already and you don't need to make changes but the Current Tag column (see above) indicates that an ID3v1 tag is present, press the Save icon to save this data to an ID3v2 tag. Even if the Current Tag column already shows an ID3v2 tag, with the ID3v1 tag present, you won't know whether the data came from the ID3v1 tag or the ID3v2 tag - this way you know for sure.
The same goes for FLAC. If you see any ID3 v1 OR v2 tags in a FLAC file you want to get rid of them, which is covered below in "Deleting ID3v1 Tags".
Deleting ID3v1 Tags
First make sure you have saved all tag data as ID3v2 tags and Mp3tag is configured to remove ID3v1 tags but keep ID3v2 tags, see above. Test it on a few files to be sure! You may also want to carry this out on 1000 files at a time. When you're ready, press the red "X" icon to delete the tags. Since we have configured Mp3tag to remove only ID3v1 tags, you will see any ID3v1 indications disappear from the Current Tag column and your new ID3v2 tags will be kept along with APEv2 tags added by MP3Gain.
If you've made an error and your tags have all been deleted select Edit - Undo and reconfigure Mp3tag as directed above.
For more information on tag types and why it's recommended to delete ID3v1 tags, see here.
To remove ID3v1 AND ID3v2 tags from a FLAC file and leave only FLAC tags, select them and press the 'red X' to remove tags (Ctrl+r), then press the 'back/undo' button right next to it to paste them back in (Ctrl+v). Mp3Tag will remove all the tags, but when you hit undo/paste it only re-writes FLAC tags to the FLAC files. You may lose embedded artwork after this process, so be prepared to re-tag that if necessary.
Removing Fields and Making Fields Identical
If you select multiple items, note that the left-hand pane data fields change to <keep> for items with multiple entries. The drop-down list for these fields now contains <blank>, <keep> and a list from the items in the tag data.
Select <blank> to remove that particular piece of tag data for all these files. Select <keep> to keep the tag data.
Note you can set items to default to <blank> for multiple items in Options - Default values. You can still change them from default on a case-by-case basis if you wish.
If you select from the list of tag items, all files will be tagged with that data. This is very useful for writing consistent artist and album tags across a whole album, eliminating spelling errors or extra spaces that will cause SlimServer to assume they are different artists or albums. It can also be used to set the artist name consistently from album to album by the same artist.
Cover Art and Other Tags
Highlight one or more files, right-click and select "Extended Tags...". You will be presented with the contents of all tags present in the file(s). You can delete fields by highlighting them and pressing the "X" icon.
On the right you will see the embedded cover art. You can add cover art, save existing cover art to disc or delete the cover art using the icons on the right.
Note: You can add a new tag as above to see how many covers are in your tags. Follow a similar procedure to the above, but name the column "Cover Art" or something similar and type "%_covers%" in the value field.
Running MP3Gain From Mp3tag
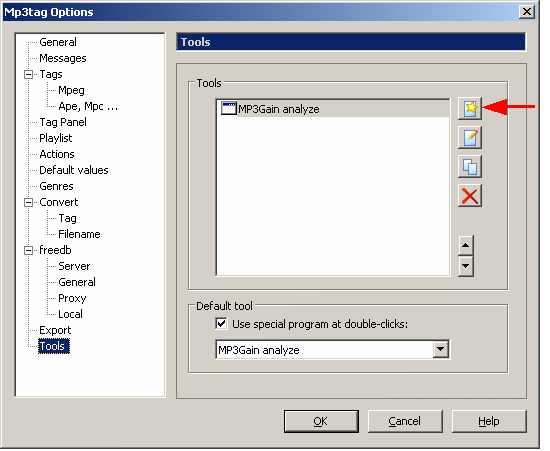
Select Options - Tools and click on the "New configuration" icon:
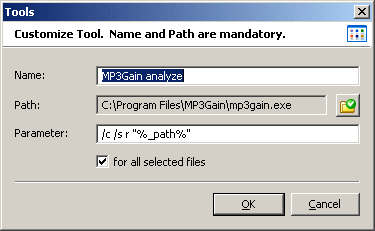
Configure the next window as follows:
Customize the name to whatever you like. Point to your MP3Gain installation using the icon to the right of the "Path:" field.
Note the "Parameter:" field entry in this example instructs MP3Gain to perform track analysis only (does not change the audio data), ignoring clipping. If you want a different configuration, determine the appropriate command-line switches by opening a command prompt, switching to your MP3Gain installation folder and typing "mp3gain /?" for MP3Gain command-line help.
The "for all selected files" checkbox will perform this operation on multiple files.
Back in the Options - Tools window, the last section entitled "Default tool" enables you to set this tool as the default tool, which will run when you double-click the file(s). Click the checkbox and select the name of your tool in the drop-down list below.
From the Mp3tag main window, you can right-click the file(s) and select your tool from the "Tools" option, or you can double-click the file(s) if you enabled this. One or more command-line windows will open, running the MP3Gain command-line program.
Naming Files Based On Tags and Making Directories Based On Tags
For optimal use with SlimServer, your music folder should be organized as follows:
artist\album\title.mp3
although track number - title.mp3 can also be used.
Mp3tag can do this automatically, even on existing music libraries with thousands of files.
Once your tags are correct, right-click the file(s) you wish to place in directories. Select Convert - Tag - Filename. You will be presented with a format string and a sample of output of the first file. To organize files in directories, type "%artist%\%album%\%title%" in the format string field. The example will change to reflect the output as you type. To use this with track numbers, try "%artist%\%album%\%track% - %title%". You can also try variants like "%album%\%artist% - %title%" for albums with various artists. The Preview button will show you the complete details of how your files will be re-organized. Once you are satisfied, press OK. Directories and titles will be made based on the tag data.
Displaying Replay Gain Information
To show track gain and album gain information, follow a procedure similar to above "Displaying the Tag Type Currently Used," adding the following four tags:
Name field: Album Gain, Value field: %REPLAYGAIN_ALBUM_GAIN%
Name field: Album Peak, Value field: %REPLAYGAIN_ALBUM_PEAK%
Name field: Track Gain, Value field: %REPLAYGAIN_TRACK_GAIN%
Name field: Track Peak, Value field: %REPLAYGAIN_TRACK_PEAK%
Recovering Tag Data from Filenames
Should you somehow lose or delete your tags but your files are in directories or properly named, select the affected file(s), right-click and select "Convert - Filename - Tag". The rest of this operation is similar to the above section and you can use the same format strings. Once you are satisfied with the example and by what you see when you press the Preview button, press OK. ID3v2 tags will be written based on folder structure or file name.
Complex Operations
Far too many to describe here, but there are some very powerful tools available within mp3tag for manipulating tags and file names, including the use of complex regular expressions (if you don't know what these are, don't ask!). Look at Convert - Actions and create a new action group and then a new action to see some of the options available.
Help and More Tips
Consult the Mp3tag help pages. You can obtain some help and tips in the Slim Devices forum but far more at the Mp3tag forum.


